| Home » Categories » Solutions by Business Process » Order Processing and Invoicer |
Staged Payment Schedule (SOP Only) |
|
Article Number: 2144 | Rating: Unrated | Last Updated: Mon, Jun 12, 2023 at 2:32 PM
|
|
Diamond and Premier Datafile 2015 Onwards Only Sales Order Processing generates each invoice with a single payment due date, this new feature allows SOP Invoice production to generate an invoice with a payment schedule recorded against it – splitting the invoice over a range of 1-9 payments.
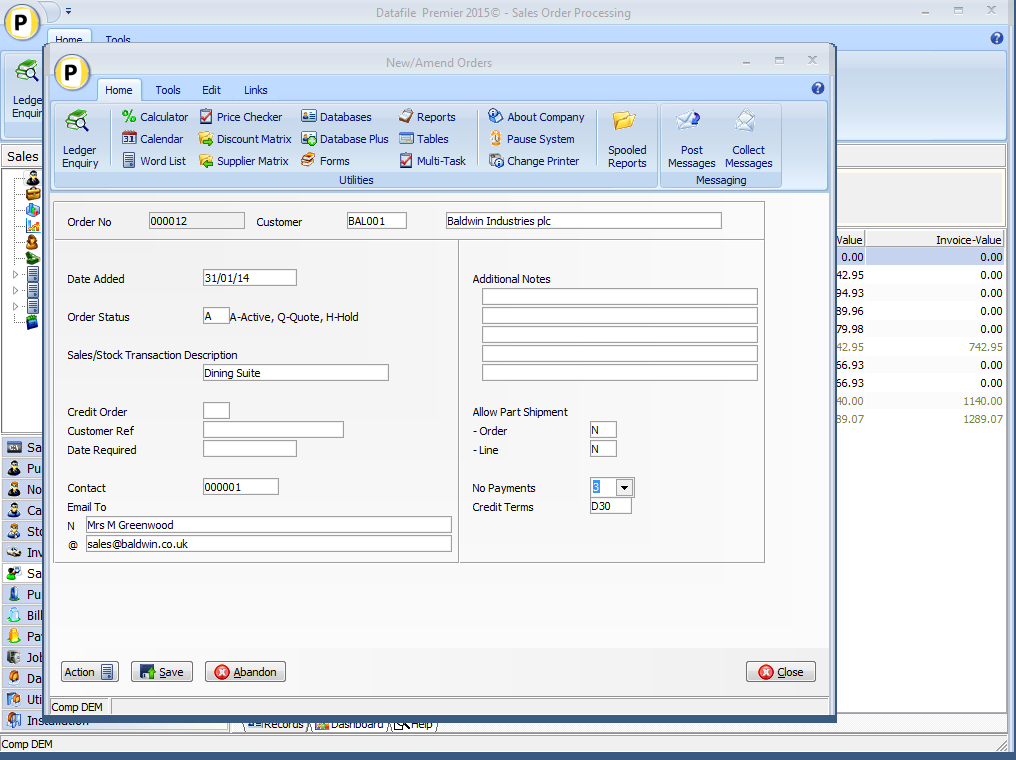
During order entry you can set the number of payments an invoice is to be split over (leaving as 0 for standard invoice production). The credit terms recorded against the sales order being used to determine the frequency the payments are required – i.e. D30 means that payment is due every 30 days, M125 meaning that the first payment is due on the 25th of next month and then the 25thof each following month for the remaining payments.
The remainder of the order entry processes continues as before.
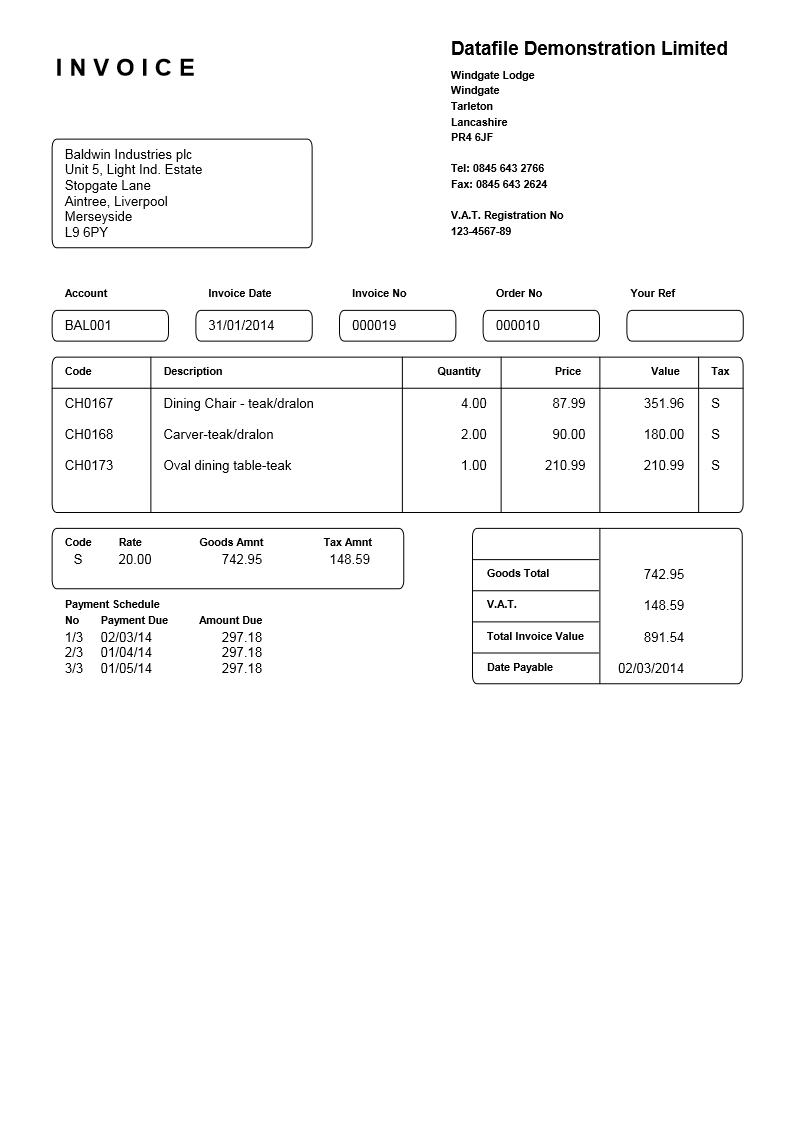
The payment schedule can be included on any document and is printed in the footer section after the final detail within the document.
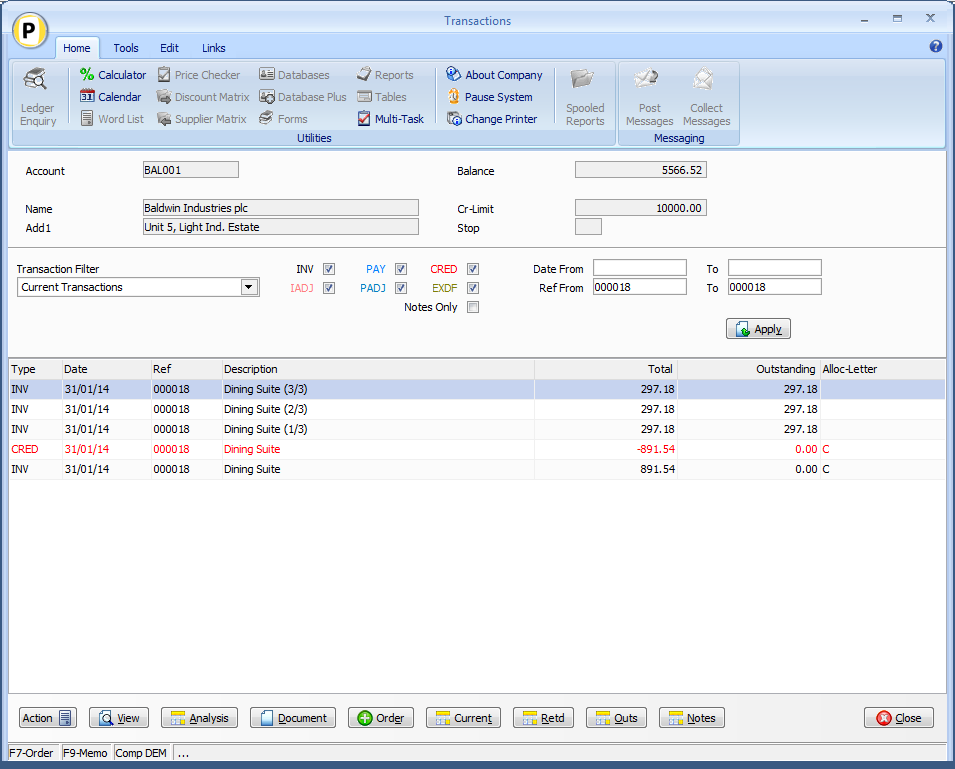
On update to the sales ledger additional transactions are generated to record the payment due dates for each split of the invoice. The standard invoice (type 1) and analysis lines (type 9) for each detail are updated but extra transactions are created as follows:
None of the additional transactions are written with a VAT amount (this is recorded on the original invoice) and nor are any analysis lines created for these transactions.
Installation Database Changes
Changes are required to the Sales Order Header file. To add the item select Installation from the main menu followed by Application Manager and then Restructure A Database. Select the Sales Order Processing application. Elect to update the Live Files and then select the Sales Order Header file. The existing data items are then displayed on screen, scroll-down to the next available blank entries and create the following items:
Item Name Type Description
NO-PAYMENTS N Holds No of Payments Invoice to be split over.
To insert a new item press <Enter> against a blank entry, enter the title as required and press <Enter>, select the item type (using the drop-down list if required), and depending on item type select the size required.
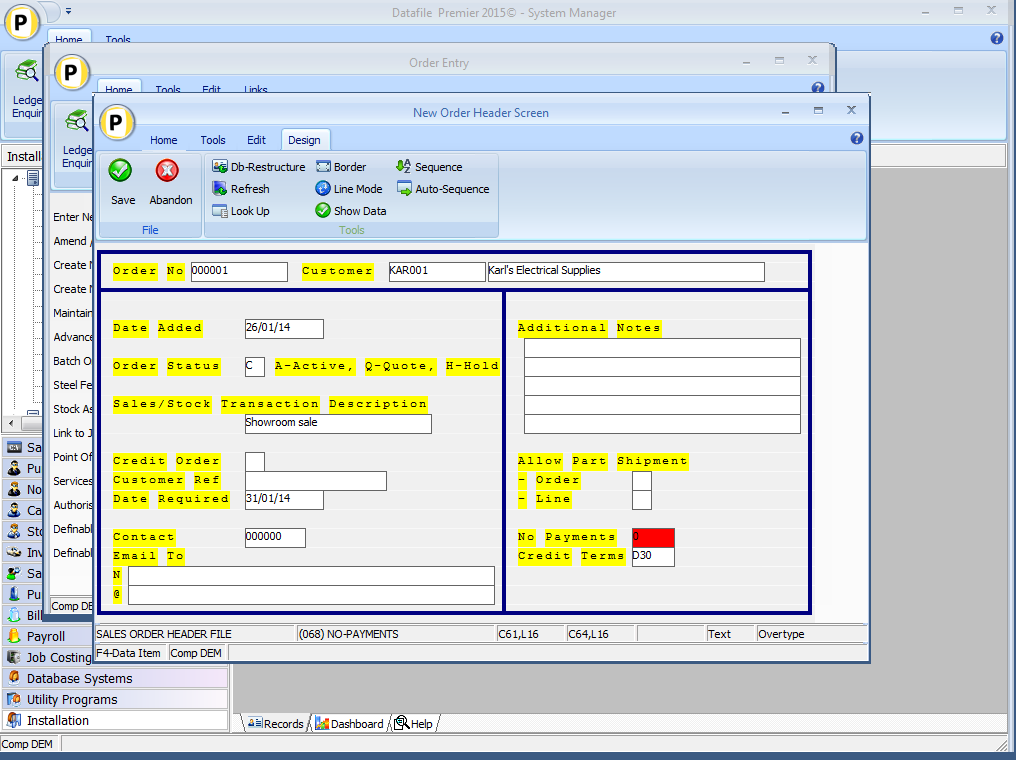
Once the required items have been recorded press the <ESC> key and select the UPDATE button to save the database changes. When prompted respond ‘Y’ to the prompts to ‘Extract Existing Data to New Database Structure’ and, if appropriate, ‘Copy Table Entries from Old Database to New Database’. Final prompts ask to ‘Remove (.OLD) Database’ and to ‘Carry Out the Same Restructure on the BASE File as well’ – respond as required. If you select to update the base file you need to manually insert the new items at the same data item positions as on the live file. Application Screen LayoutsThe No of Payments item will need to be added to the Sales Order Entry screen. To update the screen layout users can select the Installationoption from the main menu followed by Application Manager and then Application User Facilities. Select the Sales Order Processing application before selecting the Enter/Amend Orders option and then Enter New Order Header.
Screen Design is in the usual manner - To insert text labels such as ‘Allow Part Shipment’ use the mouse to position the cursor where required and then type the required text. To insert the data items position the cursor where required and press the <F4-Select> key and choose the data item required. Set whether items are view-only, mandatory or require uppercase input as required. Once the layout is complete choose File and then Save & Exit. Application User Facilities
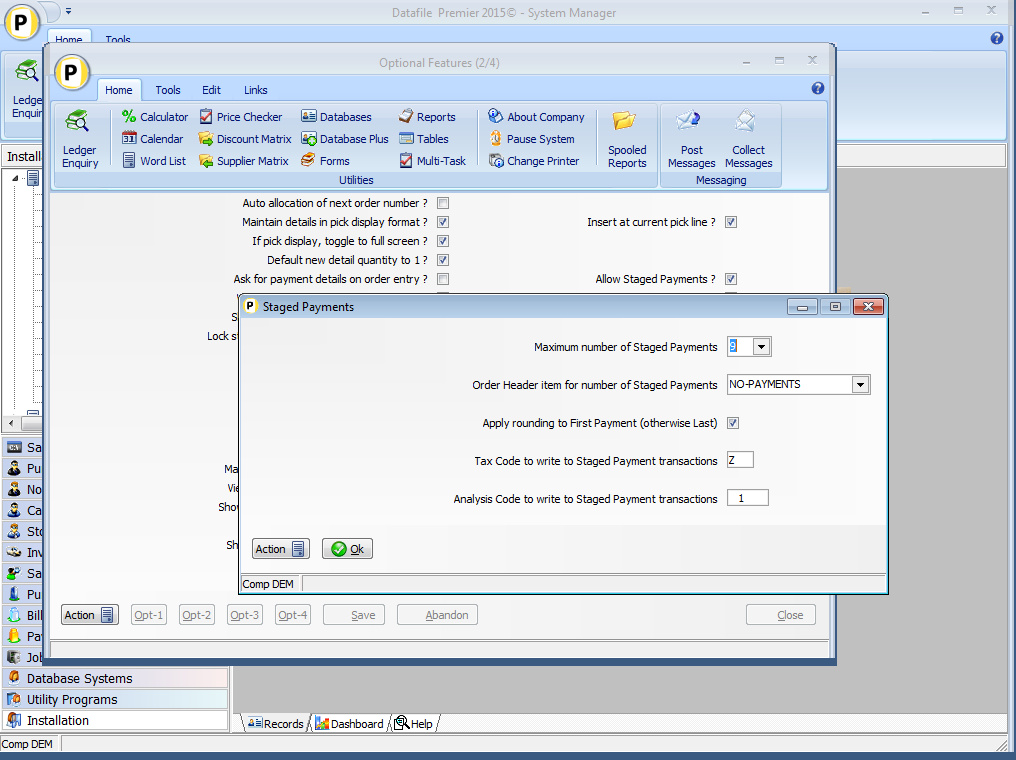
The Payment Schedule entry options are enabled within the SOP Application User Facilities. To update select Installation from the main menu followed by Application Manager and Application User Facilities. Select the required application followed by Enter/Amend Ordersand then Advanced Input Facilitiesand Optional Features. A new prompt on the second screen ‘Allow Staged Payments’ when set displays a pop-up screen to allow setting of the payment parameters.
Maximum Number of Staged Payments – set maximum allowed no of payment stages (max allowed is 9).
Order Header Item for Staged Payments – reference the Order Header item that holds the number of payments required per order.
Apply Rounding to First Payment (Otherwise Last) – the invoice total is divided by the number of payments and rounded down to the nearest penny. Any remainder is added to the last payment unless this option set when the remainder will be added to the first payment.
Tax Code to Write to Staged Payment Transactions - the additional transactions this feature creates are not VAT analysed (VAT being due against the original invoice). For reporting purposes you may wish to set a VAT code to be recorded against the extra Type 1/3 transactions.
Analysis Code to Write to Staged Payment Transactions - the analysis code on the main invoice and nominal analysis lines are updated as normal but for the extra transactions you can set another analysis code if required for reporting purposes (note the extra credit/invoice transactions in effect cancel each other out). Document Design Manager
To configure the document select Installation from the main menu, followed by Application Manager and then Document Design Manager before selecting Sales OrderDocuments and the required document category.
The system will list the available documents – enter the number of the document to update in the prompt at the bottom of the screen and the document mask will be displayed.
From the ribbon choose the Parameters option and then select the ACTION button to move to screen 13 – Tax / Payment Analysis Tables.
Process for Staged Payments – set to print the payment schedule, and if Invoice document, process the payment schedule when updating the Sales Ledger. When set a pop-up form allows additional parameters.
Note
It is generally more straight-forward to set the print titles within the parameters but to position the print items from the document mask – as such on initial set-up leave line/column inputs as 0 to define from the mask. You can then position the print items for the Payment Schedule from the Document Mask. When adding a data item select the ‘Staged Payments Table’ category.
Title – set the title to be printed for the Payment Schedule.
Print at Line / Column – line / column position to print the title.
Print Line for Headings – line position to print the payment schedule headings.
Start Line for Entries – line position to begin printing the payment breakdown
Payment Schedule (Column, Text and Text Column) – set the column number to print the payment schedule number X/Y (where X is payment number, Y is total no of payments), enter any text to print as column heading for the payment schedule and the column at which this is to print.
Due Date (Column, Text and Text Column) – set the column number to print the due date of the payment schedule, enter any text to print as the column heading for the due date and the column at which this heading is to print.
Amount Due (Column, Text and Text Column) – set the column number to print the amount due for the payment schedule, enter any text to print as the column heading and the column at which the heading is to print.
Discount Amount (Column, Text and Text Column) – set the column number to print any available settlement discount, enter text to print as the column heading and the column at which the heading is to print.
Pay by Date (Column, Text and Text Column) – set the column number for the settlement due date, enter text to print as the column heading and the column at which the heading is to print.
"If Paid By” (Column, Text) – set the column and text label to print the ‘If Paid By’ text. This allows you a text description between the amount due and settlement details.
Note
This feature would not be applied to a credit note document. If a staged payment invoice needs to be credited it will be credited in full (and you would allocate the single credit against the separate invoices). If you wish to credit a stage of the invoice a new credit order must be added.
If used on a ‘multiple order’ invoice document then the number of payments / credit terms are taken from the first order processed.
Settlement Terms are processed in the same manner as Credit Terms. If use D15 then the first payment discount expires 15 days after the original invoice date, the second payment 15 days on from there and so on. If use monthly terms such as M115 then it’s the 15th date of each month.
The Payment Schedule will only print if no of payments set to non-zero value on the order.
|
Attachments

There are no attachments for this article.
|
Document Processing - Alternative Extra Text Items
Viewed 1571 times since Fri, Jun 19, 2020
Quick Forms - Select by Alternate Account (SOP Only)
Viewed 333 times since Thu, Jan 2, 2025
Allow Part Deliveries by Order (SOP Only)
Viewed 1865 times since Fri, Apr 8, 2016
Mandatory Customer and Supplier Reference by Account
Viewed 1968 times since Tue, Feb 23, 2016
Application Pick Lists - Change Order Status
Viewed 2710 times since Wed, Sep 21, 2016
Credit Note Documents / Deposit Refunds – User Authorisation Options (SOP Only)
Viewed 116 times since Thu, Jan 9, 2025
Record Order Values by Status against Customer / Supplier
Viewed 2115 times since Fri, Jul 15, 2016
Additional Order Accumulation Items
Viewed 1726 times since Fri, Jun 19, 2020
Nominal Code as Document Confirm Item
Viewed 1905 times since Mon, May 16, 2016
Use Stock Prices from ‘Master’ Stock Item
Viewed 2575 times since Fri, Jul 15, 2016
|
| Datafile Home | KB Home | Advanced Search |
|
 |
|
|
|
|
|
|
