| Home » Categories » Solutions by Business Process » System Features |
Ledger Enquiry - Additional History Enquiry Databases |
|
Article Number: 2285 | Rating: Unrated | Last Updated: Wed, Oct 23, 2024 at 11:25 AM
|
|
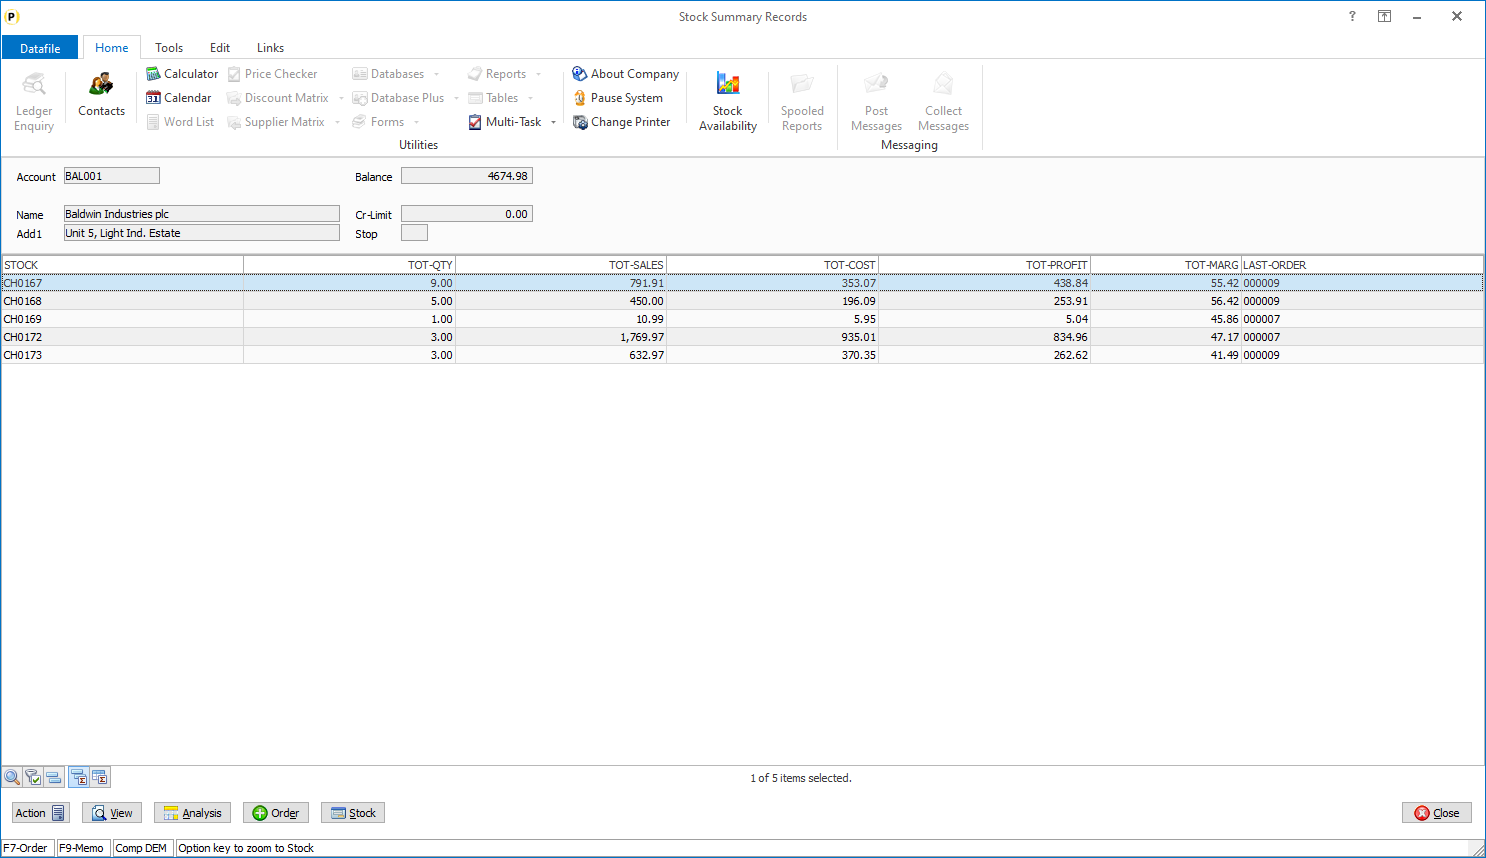
The History database is a user-definable enquiry database that can be configured for display against selected applications. The Sales Ledger, for example, allows for two history databases to be defined – the key is that the history database must contain the sales account code. You could, perhaps, configure the Sales Ledger enquiry to list activity records for the customer, discount matrix entries for the customer or indeed a database of your own. New in this release the number of history databases and the applications the databases are available for have increased.
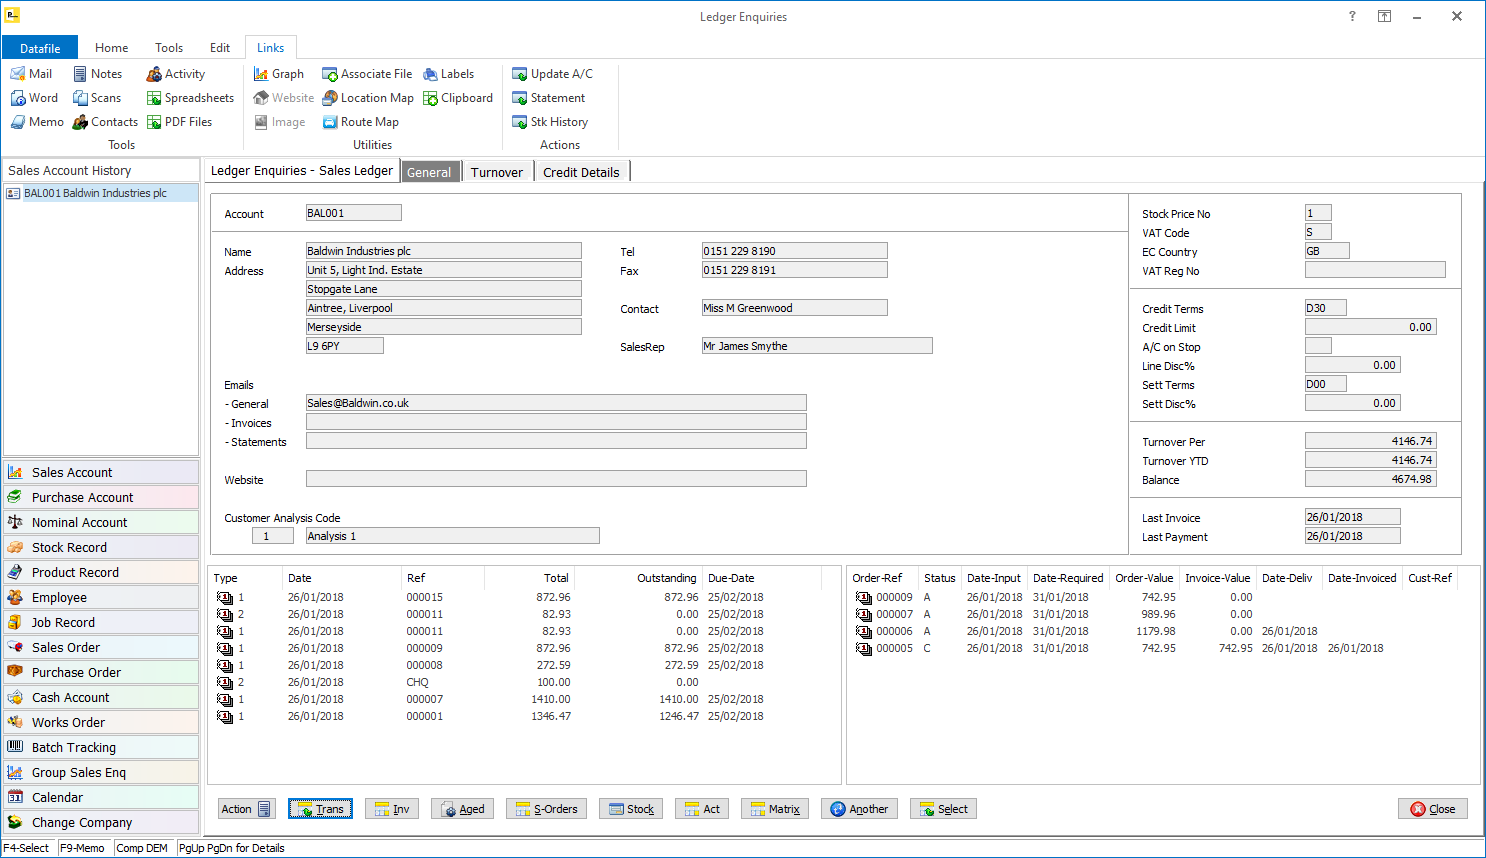
NB: Here the Sales enquiry is configured to show the three history databases – showing Stock (a Profiler maintained summary of the stock items the user has bought), Activities and Discount Matrix special prices. Each of the history databases can have its own ‘detail’ database off it and has full screen enquiry options.
InstallationLocation of FilesTo configure the Ledger Enquiry application to display a history database you must first add the database to the location of files. Select Installation from the main menu and then Lock Out All Systems.Once systems locked choose Application Manager and Location of Database Files – respond Y to change the live files, leave blank to the prompt for global changes. 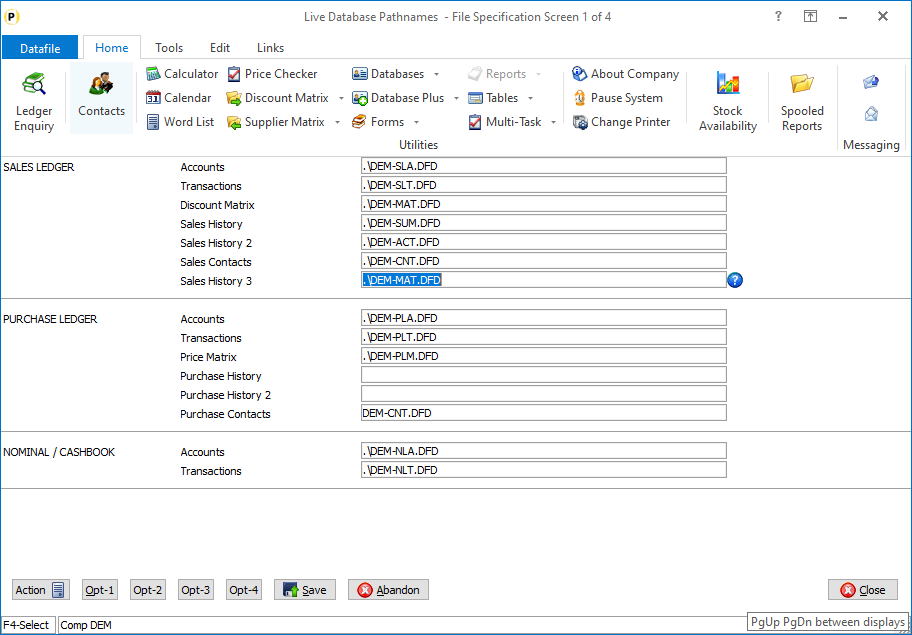
The location of files is defined over four screens – subject to applications in use. The Sales / Purchase history databases are defined on page 1, the Stock history databases on page 2, the Sales Order and Purchase Order history databases on page 3 and the Bill of Materials history databases on page 4. Enter the database filename – including path where relevant – to the required history database. Ledger Enquiry ManagerOnce the history database(s) is defined you are then able to configure the Ledger Enquiry. From the main menu select Installation followed by Ledger Enquiry Managerand Enquires Configuration.Select the application required followed by Transaction / Detail Enquiries. 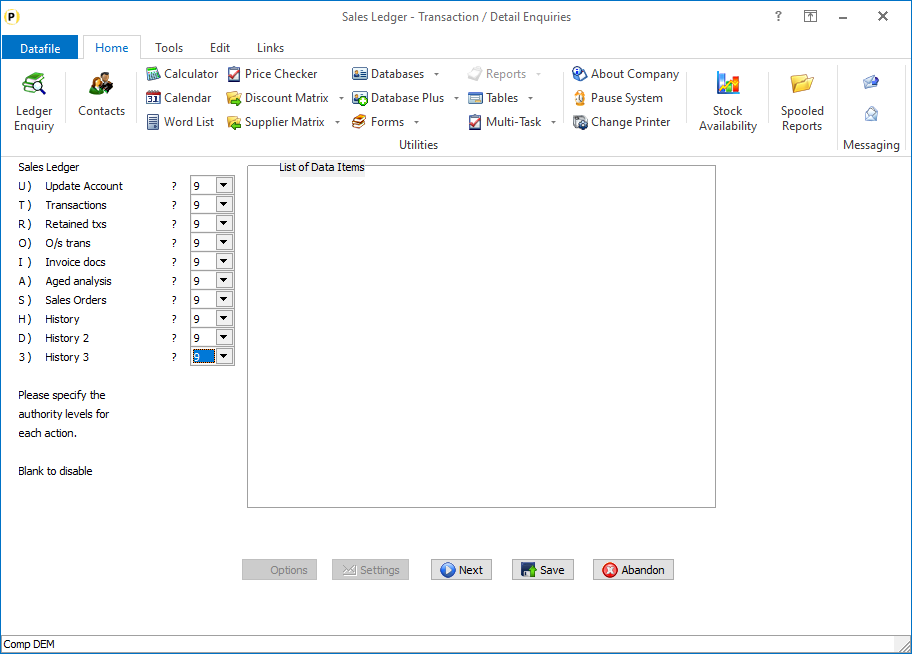
The application databases (and other options) are listed and you can set the authority level required for access – leave blank to not allow any access to this option. Authority levels are defined from 0 (highest) to 9 (lowest). Once all the authority levels are set click NEXT to configure the transaction enquiries. 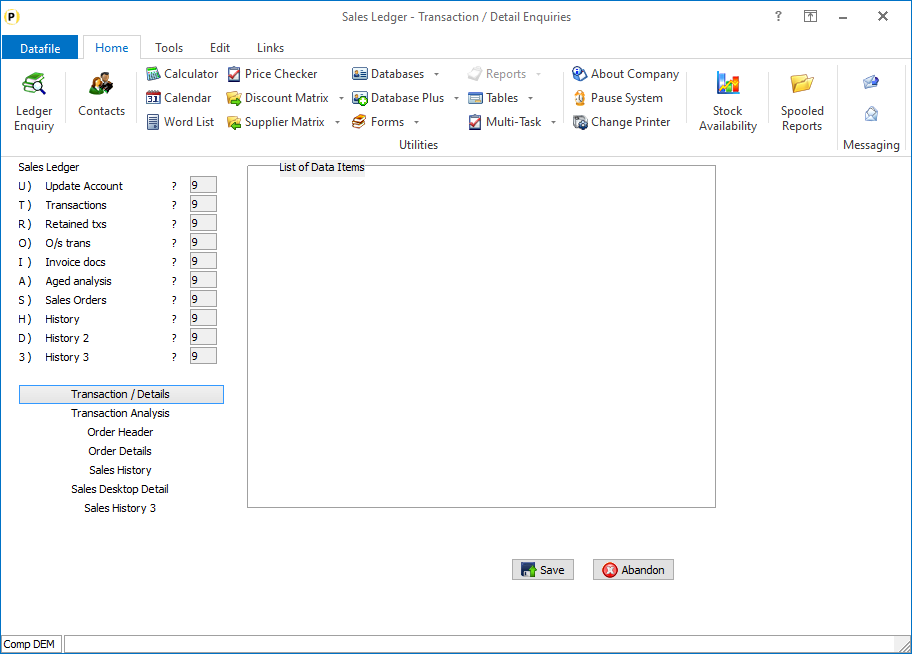 Each of the application databases available are listed followed by the history files. Choose the appropriate history file for configuration. 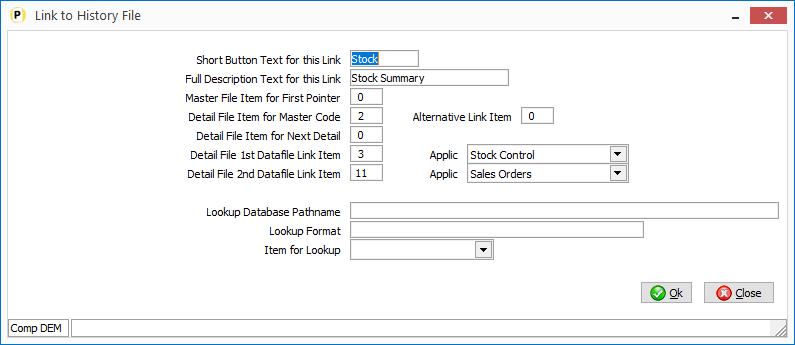
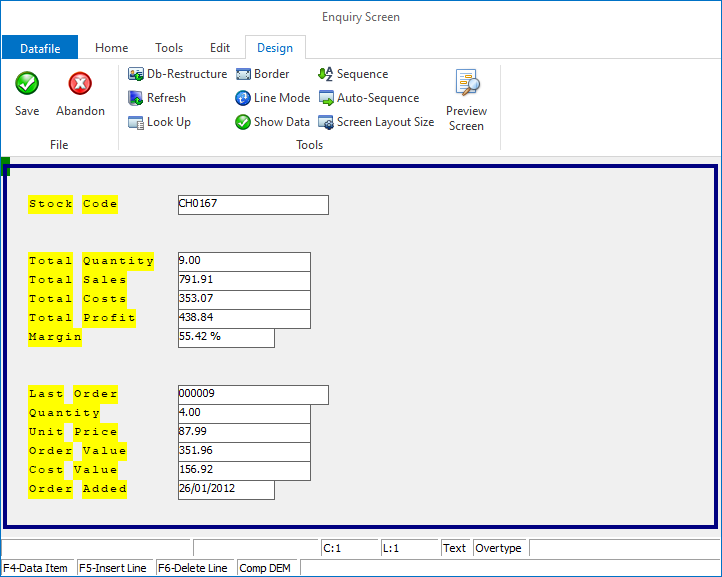
Full Description Text for this Link – enter the full text to be displayed. Master File Item for First Pointer – a history database can be defined to link in one of two ways. A record pointer chain, if available, can be used or you can use the indexes on the history file. Normally the databases used as a history file would not have a pointer chain so this item can be left blank. If a pointer chain does exist reference the data item on the application database that contains the record pointer for the first history record. Detail File Item for Master Code – this option asks for the data item on the history file that contains the main application record index (for example on a sales history database the item that contains the sales account code, on a stock history database would be the stock code and so on). This option is mandatory and, if no pointer chain in use, this item must be defined on the database as a secondary index. Alternate Link Item – new in 7.4 this option asks for an item on the main application file instead of the prime index to use when selecting the history records for display.See the separate documentation for this feature. Detail File Item for Next Detail – if using a pointer chain reference the item on the history database that records the record number for the next history record for the ‘account’.Leave as zero if using the secondary index. Detail File – 1st Datafile Link Item / Application– As well as having a link to the current application the history database may also contain details for other applications. Our Stock Summary example also contains the Stock Code and Last Sales Order for example.This option allows you to reference the data item number and the application allowing you to ‘zoom’ from the history database to that application enquiry to view more detail.Reference the data item and application required. Detail File – 2nd Datafile Link Item / Application – a second link option can also be defined. Lookup Database Pathname – when displaying history records it can be useful to include within the list items from another linked database/record. Using our Stock Summary example, we may want to include the stock description or current retail price for the item. Alternatively, a common use for a history database in stock control is to list any assembly components for the stock item, as such displaying the current physical/free stock for those components may be desirable.Reference here the database path and filename if a lookup is required. Lookup Format – this prompt asks for the index format for the lookup. This uses our standard code formats, for example AAA999 or UUUUUUUUU.Where A represents an uppercase letter, U allows any character but if a letter is uppercase, X is any character and 9 allows any number from 0-9 – delimiter characters may also be used.For this link you can use UUUUUUU to the index format size. Item for Lookup – reference the data item on the history database that contains the index value of the lookup database (i.e., the stock code on our stock summary / component stock example) After confirming the file link settings, we are then asked for the list items. 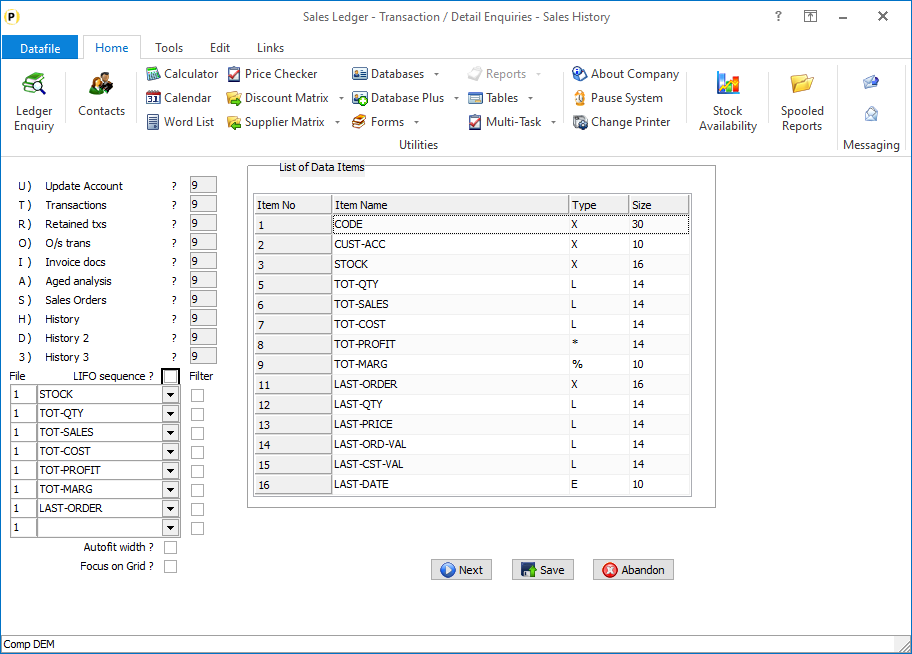 LIFO Sequence – if using the pointer chain leave this item blank, if using secondary index set whether to display the history records in last-in-first-out order. (If using pointer chain and wish to display in LIFO order you can reference the ‘first’ pointer on the master record as the ‘last’ record and the ‘next’ detail pointer on the history database as the ‘previous’ record pointer.) File – this option will only display if using a lookup database. Enter ‘1’ to select an item for list from the main history database, enter ‘2’ to select an item from the lookup database. Data Item – select the data item from the history / lookup database to be displayed. These items are the default list items, subject to configuration settings additional items can be added/removed by the user as required. Filter – applicable for the history data items set if you wish to allow a filter to be entered based on this item to restrict the records listed. Auto Fit Width – set so ‘shrink’ display size of the columns to fit all items on screen, leave blank to display as per item size and allow a horizontal scroll bar if required. Focus on Grid – if using filter items then the initial focus will be to enter a filter item, selecting this option lists the details first and you can go back and set a filter if required.  Use a Full Screen Layout for Stock History/Detail File Enquiry – select if you wish to enable the use of the VIEW button to display a full screen enquiry for the history/detail record.
To add text to the screen, you use the mouse or arrow keys to position the cursor at the start of where you wish to enter your text, and type in the required label(s). To clear any text, use the space bar. To add a data itemto the screen, you use the mouse or arrow keys to position the cursor at the start of where you wish the item to display and then either ‘right-click’ with the mouse or press <F4-Select>.The list of available data items is displayed for you to select. To delete a data item from the screen, use the mouse to click the item and then hit the <DELETE> key. To draw bordersaround the screen, choose the option ‘Border’ on the Tools pull-down at the top of the screen. To draw a line on the screen, select the option ‘Line Mode’ on the Tools pull-down, and then use the mouse to click the start position of the line, and then drag the line (horizontally or vertically) to the end position of the line. To delete a line, use the mouse to select the line, (it will turn blue when selected), and then hit the <DELETE> key. Once the line(s) has been drawn, to switch back to text mode, use the option on the Tools pull-down. Once complete choose the ‘Save’ option. 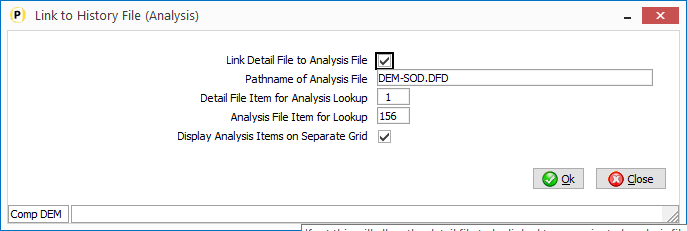
Link Detail File to Analysis File – select if the History/Detail database is a ‘master’ file that can link to another ‘analysis’ database.This option is only applicable where the History/Detail database is prime-indexed, and the analysis database contains a secondary indexcontaining the history/detail prime-index value. Pathname of Analysis File – enter the database pathname for the analysis file. Detail File Item for Analysis Lookup – reference the prime-index item on the history/detail database. Analysis File Item for Lookup – reference the item on the analysis file that holds the value from the prime-index of the history / detail file. Note that this item must be a secondary index. Display Analysis Items on Separate Grid – if not set then the history/detail record list is split in half. The left-hand side displays the history/detail records and the right hand side shows the linked analysis records. As you scroll up/down the list the detail records on the right are refreshed based on the current highlighted record. When set the system displays the analysis records via an ANALYSIS button on the history/details grid. 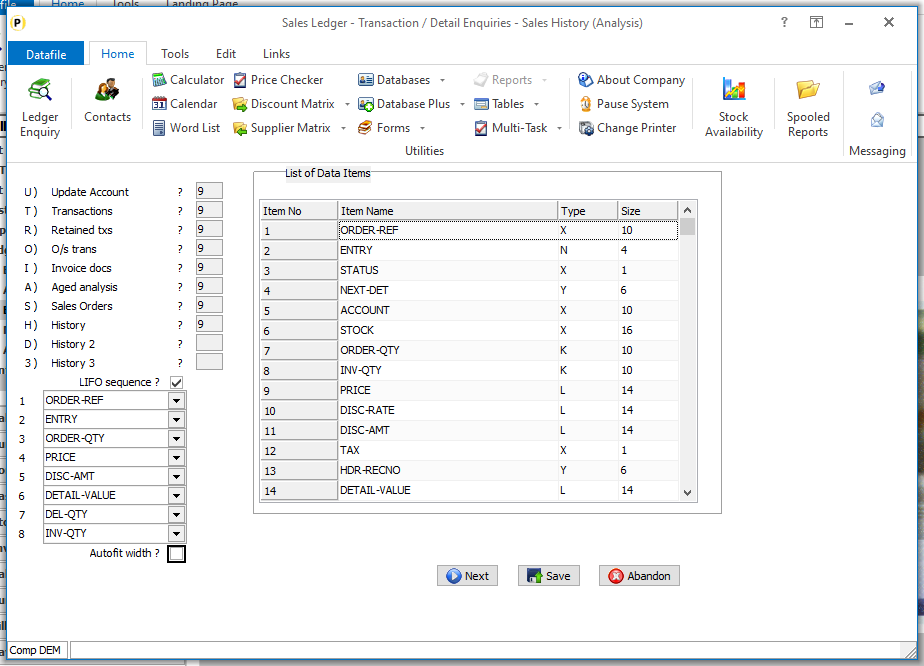
LIFO Sequence – set whether Analysis records are to be listed in LIFO sequence. List Items – select up to eight items from the Analysis database to be listed, <F4-Select> is available as required. Autofit width – set to compress the display items from the Analysis file (largest item compressed) so that the horizontal scroll bar is not activated.
Use a Full Screen Layout for History (Analysis) Enquiry - select if you wish to enable the use of the VIEW button to display a full screen enquiry for the analysis record, if set then a screen design template is displayed for configuration (see screen design notes above). |
Attachments

There are no attachments for this article.
|
Second Stock Group Matrix Entries
Viewed 3166 times since Fri, May 27, 2016
Landing Pages - Include Filtered Records in Count
Viewed 364 times since Tue, Oct 15, 2024
Output to Microsoft Excel 2007
Viewed 96304 times since Mon, Jun 11, 2012
Landing Pages - Copy Configuration between Users
Viewed 1314 times since Thu, Jun 18, 2020
Datafile Software - User ID Set Up
Viewed 8169 times since Wed, Jun 13, 2012
Ledger Enquiry - Prevent Auto Close of Associated File Folder on Enquiry
Viewed 756 times since Wed, Oct 23, 2024
Report Generator - Application Reports
Viewed 2210 times since Wed, Jun 13, 2012
Ledger Enquiry - Display Stock Locations in Enquiry Panel
Viewed 800 times since Tue, Oct 15, 2024
Email Documents - Set CC and BCC Email Addresses
Viewed 3698 times since Wed, Sep 21, 2016
Landing Pages - Check for Refresh Every X Minutes
Viewed 783 times since Tue, Oct 15, 2024
|
| Datafile Home | KB Home | Advanced Search |
|
 |
|
|
|
|
|
|
