Forecast Dates can be used within a database to perform ‘calculations’ based on a date item.These calculations can be as straightforward as adding/subtracting a set no or days or calculating the age in years or months of a set date against today’s date. Other options allow you to represent the date as the day of the week – i.e. 25/11/2024 is a MONDAY.
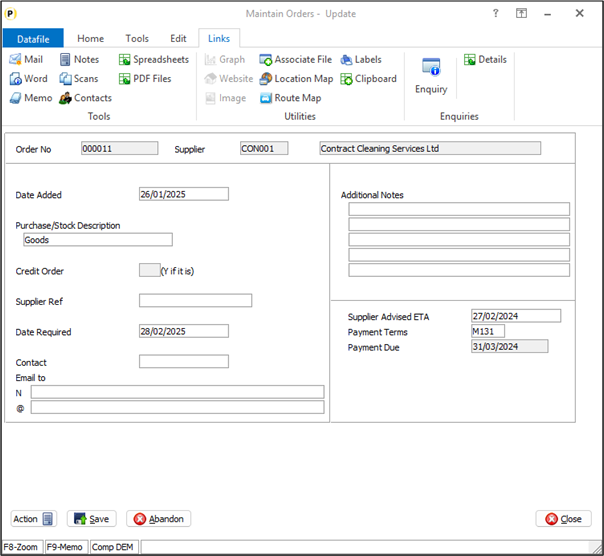
One forecast date option is to allow a Credit Terms style forecast date. When setting credit terms, you can use the likes of D30 to add 30 days, D7 to add 7 days or use options such as M131 to set the payment date as the last day of the following month. The credit terms forecast date replicates this functionality in a calculation.
A use for this type of forecast date may be to assist with cash flow planning of purchase orders.If you have an active purchase order for which you must pay within 30 days of arrival then, until you receive the supplier invoice, you can’t report on the liability. If you create a forecast date on the purchase order using the ETA of the goods you can calculate when payment would be due.

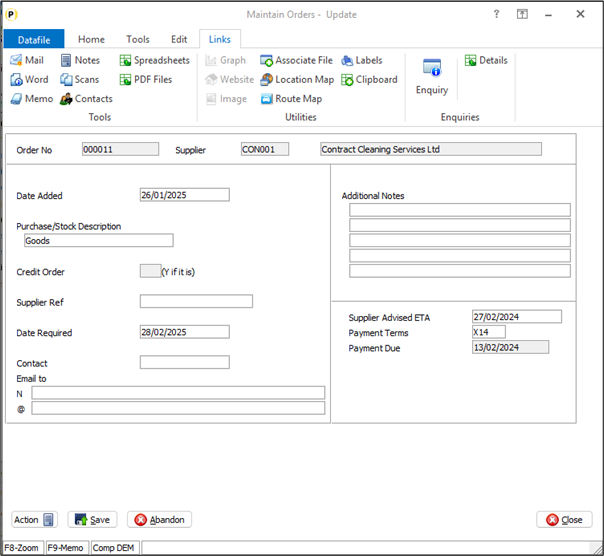
There can though be occasions when payment is required a set no of days prior to arrival – particularly when using overseas shipping where may have to pay for the goods, loading fees, transport fees and so on. Credit Terms style Forecast Dates only allowed for calculated dates to be future dates; this new feature allows you to set a payment term to be a set no of days in the past.

Setting the Payment Terms as X14, for example, sets the payment due date as fourteen days earlier than the advised arrival date.
Installation
If using Credit Terms style forecast dates already, no additional configuration is required – you can use the Xnn within the terms input to set a date in the past and continue to use the Dnn or Mnnn style terms to set future dates as needed.
To setup a Payment planning date as per the example above then you will need to add the items to the Purchase Order Header database.
Database Changes
To add these items, select Installation from the main menu followed by Application Manager and then Restructure a Database. Select the Purchase Order Processing application and elect to update the Live Files and then select the appropriate application file.
To insert a new item press <Enter> against a blank entry, enter the title as required and press <Enter>, select the item type (using the drop-down list if required), and depending on item type select the size required.
File Item Name Type Description
POH ETA-DATE E Base Date for the payment due forecast – here using the supplier advised ETA
POH TERMS X(4) Payment Terms – you may wish to copy this from the supplier account using the Set Database Profiles options if you have agreed dates where you must pay before/after goods arrival
POH PAYMENT-DATE F Forecast Date – set to type ‘C’ and nominate the base date as the ETA date and the plus value as the Terms.

Once the required items have been recorded press the <ESC> key and select the UPDATE button to save the database changes. When prompted respond ‘Y’ to the prompts to ‘Extract Existing Data to New Database Structure’ and, if appropriate, ‘Copy Table Entries from Old Database to New Database’. Final prompts ask to ‘Remove (.OLD) Database’ and to ‘Carry Out the Same Restructure on the BASE File as well’ – respond as required. If you select to update the base file you need to manually insert the new items at the same data item positions as on the live file.
Application Screen Layouts
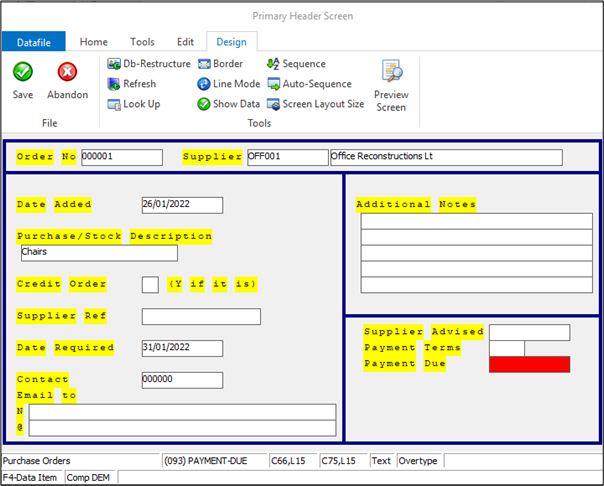
For this example, updates are required to a Purchase Order entry screen to allow input and display of the terms and payment dates.
To update the main Purchase Order screen, Installer users can right-click on the Order Entry option on the main POP menu and choose to the Maintain New Order Headers screen. Alternatively, select Installation from the main menu followed by Application Manager and Application User Facilities. Select the Purchase Order Processing application followed by Enter/Amend Orders and Maintain New Order Headers.

Screen Design is in the usual manner - To insert text labels such as ‘Alternate References’ use the mouse to position the cursor where required and then type the required text.To insert the data items, position the cursor where required and press the <F4-Select> key and choose the data item required. Set whether items are view-only, mandatory or require uppercase input as required.
Article ID: 2412
Created On: Thu, Jan 9, 2025 at 12:10 PM
Last Updated On: Thu, Jan 9, 2025 at 3:04 PM
Online URL: https://kb.datafile.co.uk/article/forecast-dates-negative-lsquo;credit-terms-dates-2412.html